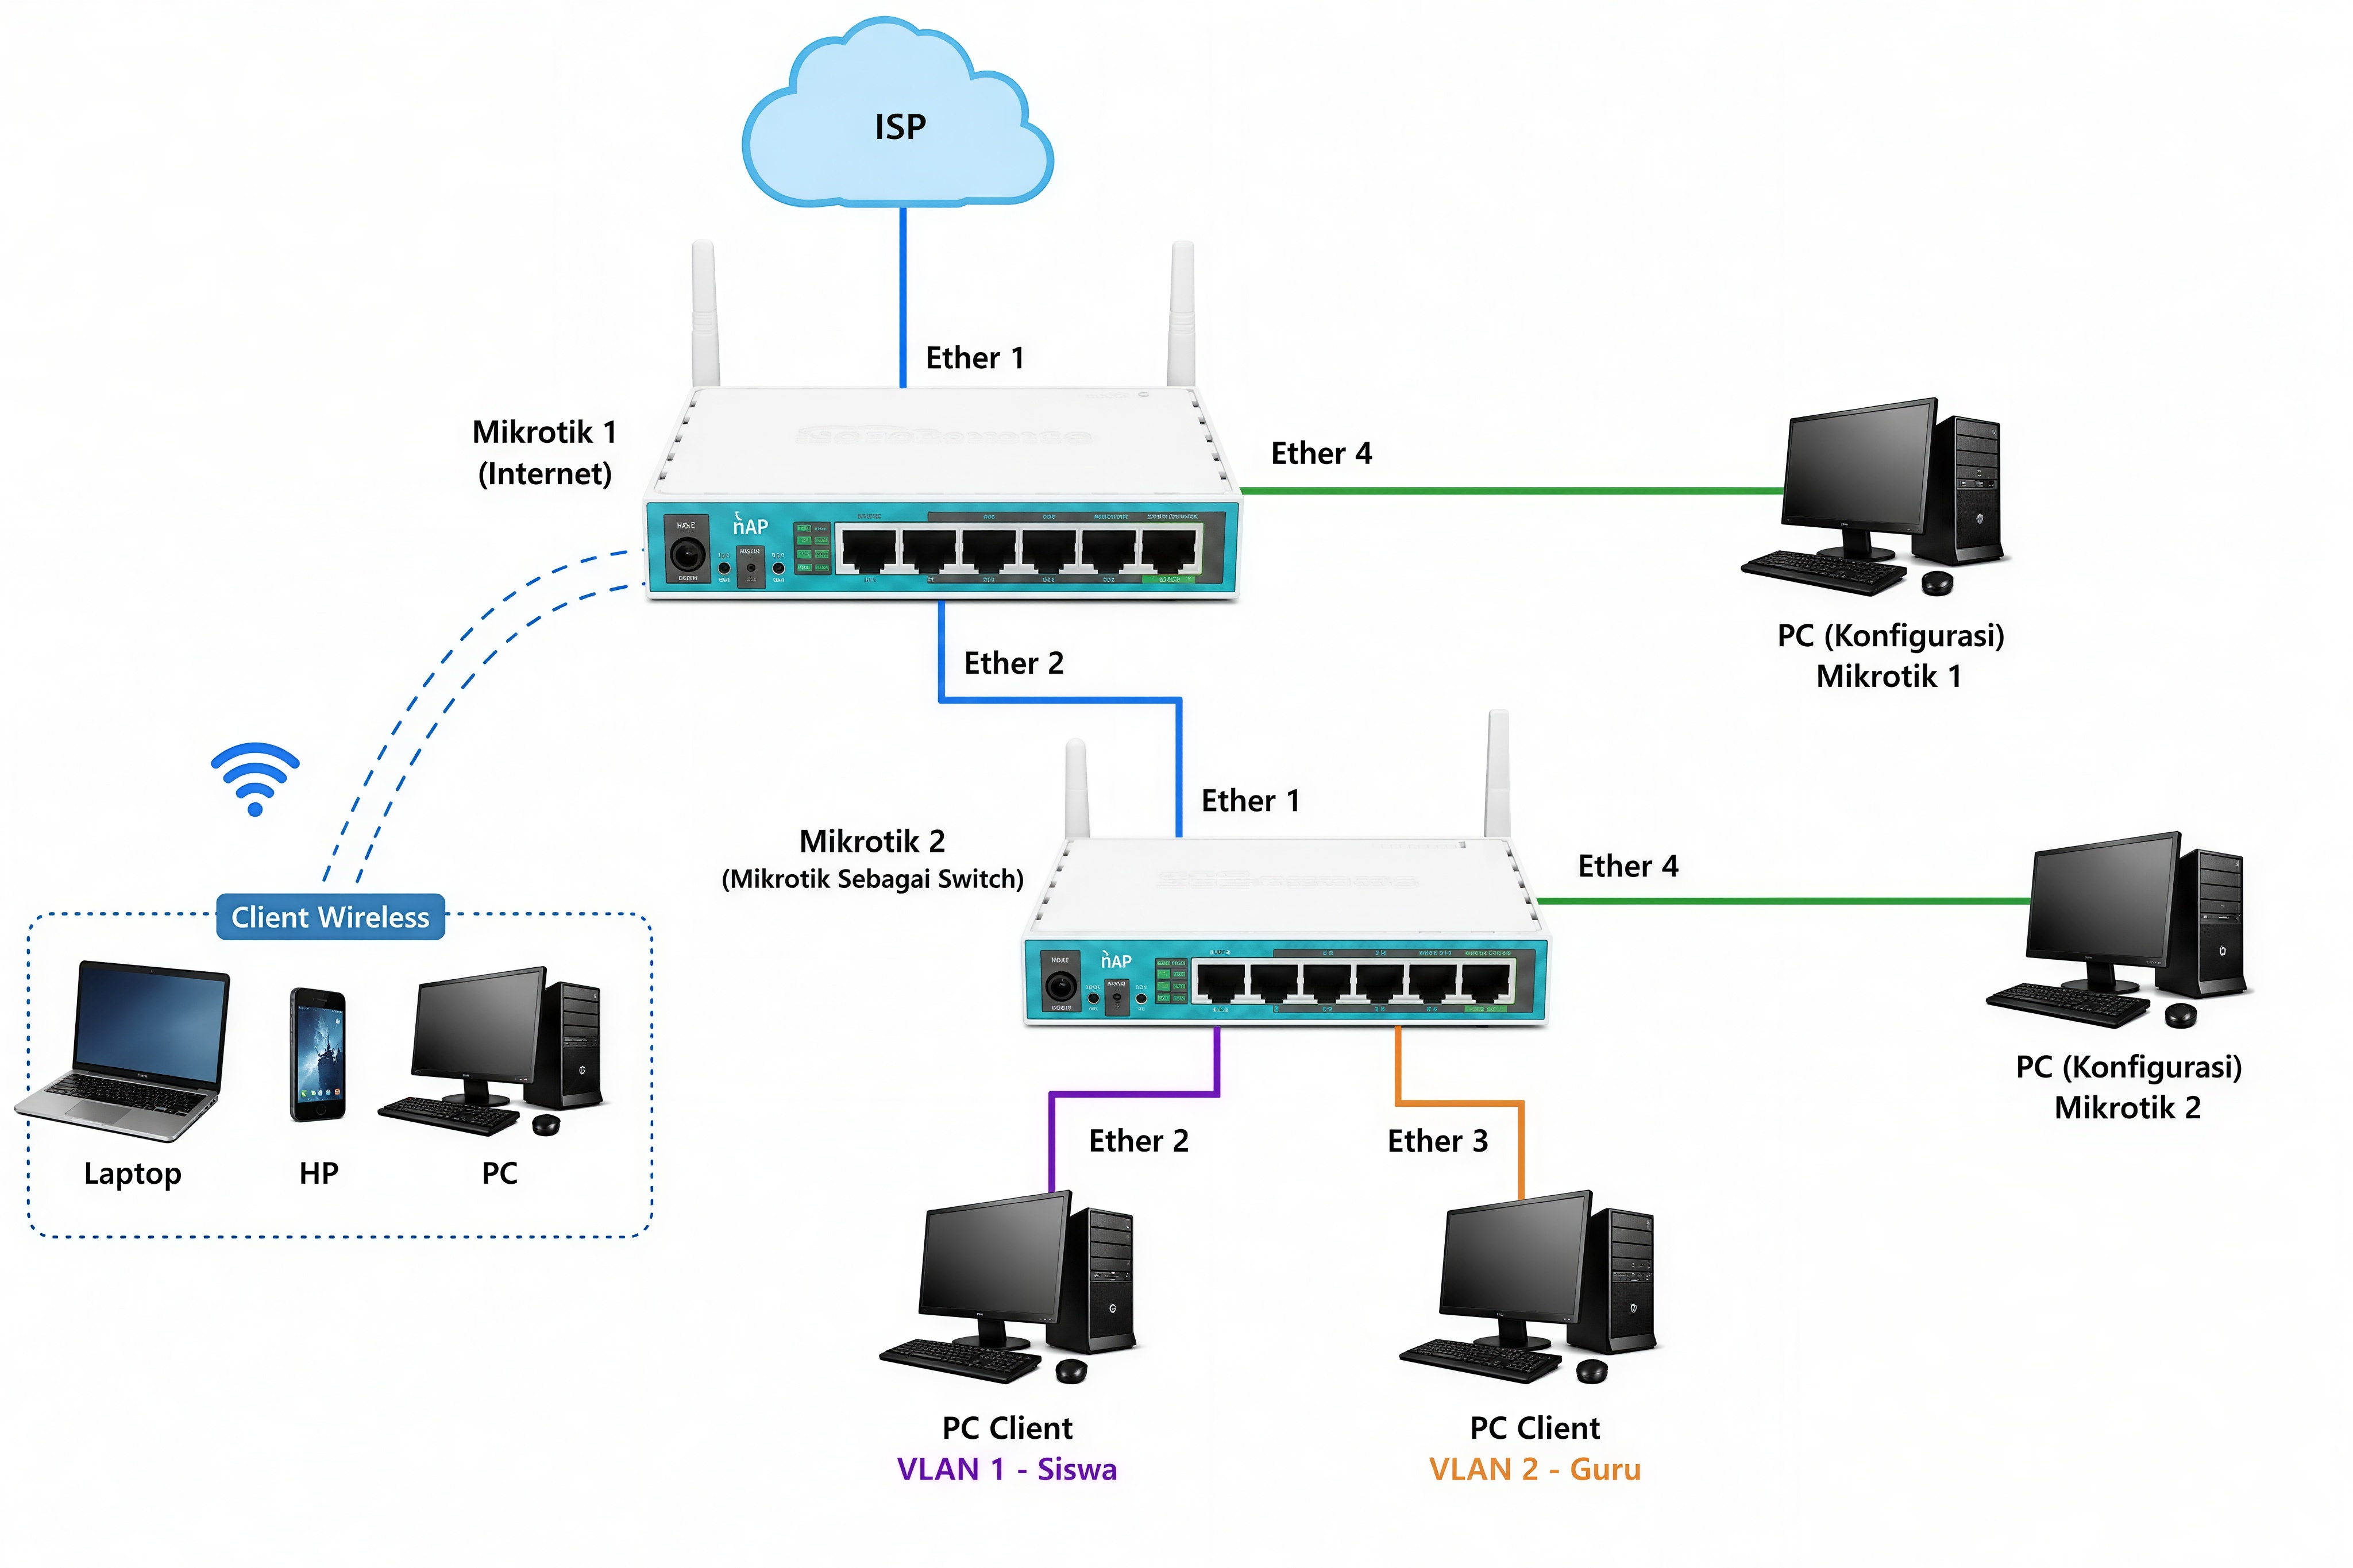
A. Topologi Jaringan
- ISP: → Ether 1 Mikrotik 1 (Internet)
- Ether 4 Mikrotik 1: → PC (Konfigurasi)
- Ether 2 Mikrotik 1: → Ether 1 Mikrotik 2 (Mikrotik Sebagai Switch)
- Ether 2 Mikrotik 2: → PC (Client VLAN 1-siswa)
- Ether 3 Mikrotik 2: → PC (Client VLAN 2-guru)
B. Konfigurasi Mikrotik 1 (Router Utama & Wireless)
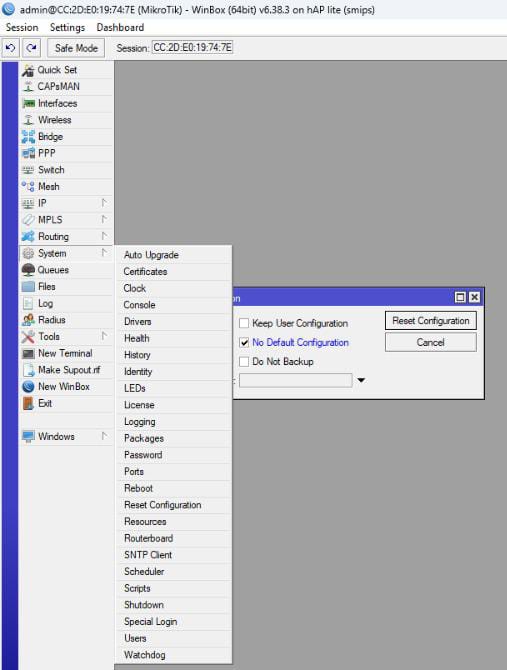
1. Bersihkan Semua Konfigurasi
- Klik
System→Reset Configuration - Centang (✓) "No Default Configuration"
- Klik Apply → OK
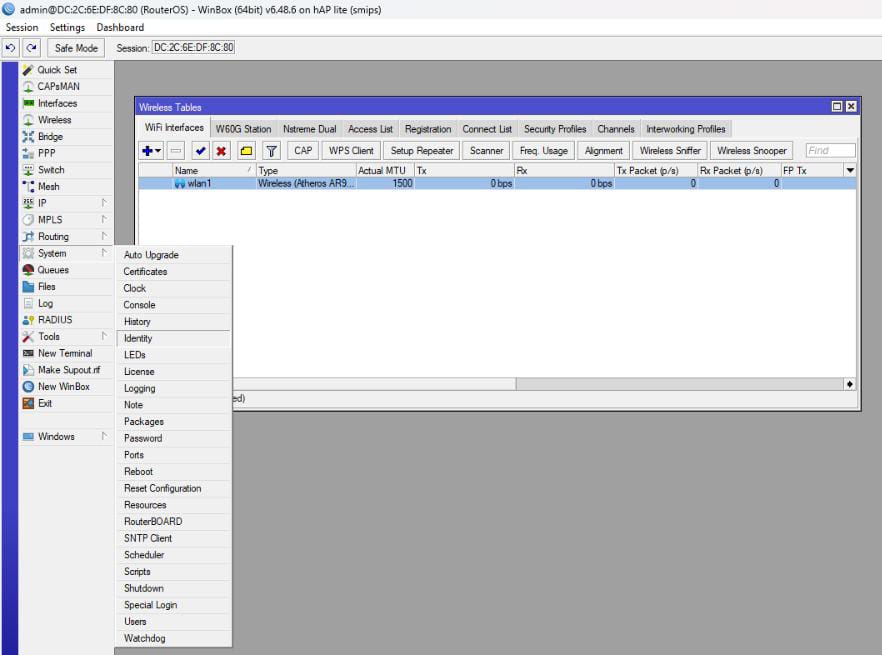
2. Berikan Identitas pada Mikrotik 1
- Klik
System→Identity - Masukkan nama
Wifi Routerboard - Klik Apply → OK
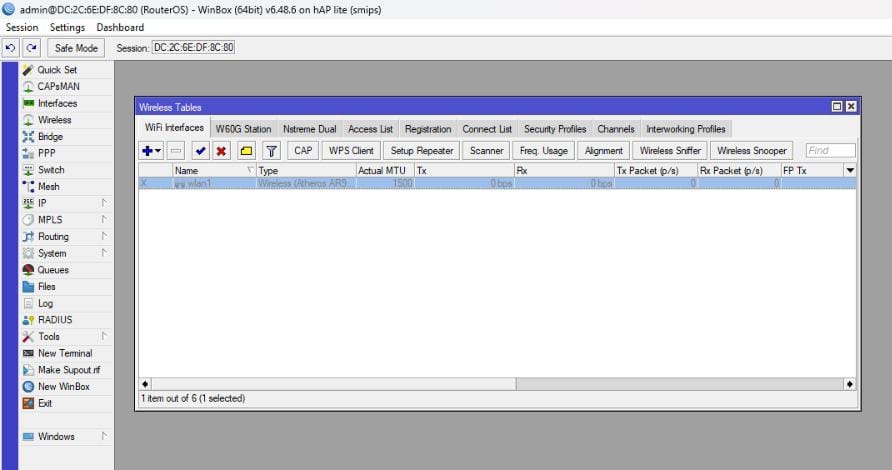
3. Nyalakan Wireless
- Masuk ke wireless
- Klik wlan1 1x
- Klik centang (✓)
4. Membuat VLAN 1 & 2
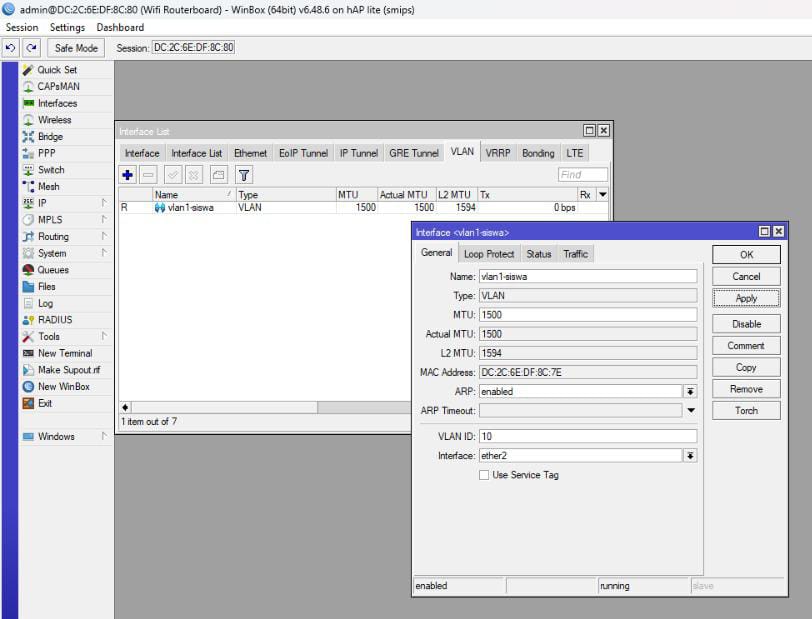
a. VLAN 1:
- Klik Interface → VLAN → Klik "+"
- Atur:
- a) Name:
vlan1-siswa - b) VLAN ID:
10 - c) Interface:
ether2
- a) Name:
- Klik Apply → OK
b. VLAN 2:
- Klik Interface → VLAN → Klik "+"
- Atur:
- a) Name:
vlan2-guru - b) VLAN ID:
20 - c) Interface:
ether2
- a) Name:
- Klik Apply → OK
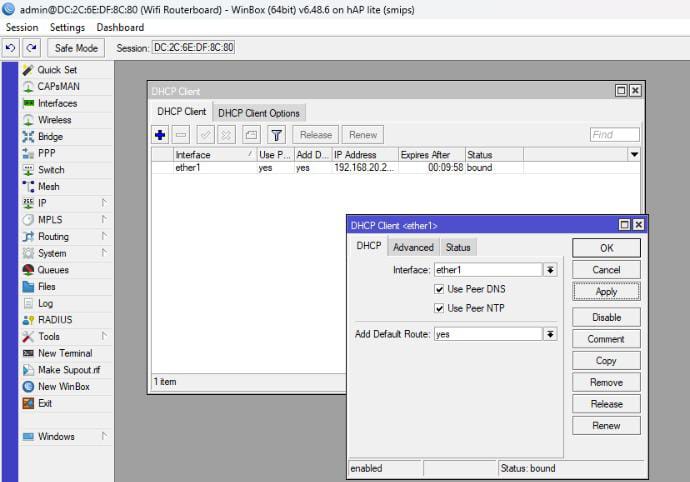
5. Memberi Mikrotik Internet dari ISP
- Klik
IP→DHCP Client→ Klik "+" - Interface:
ether1 - Klik Apply → OK
6. Memberi IP Address (Alamat IP) pada vlan dan wlan
a. WLAN1:
- Klik
IP→Addresses→ Klik "+" - Atur:
- a) Interface:
wlan1 - b) Address:
192.168.20.1/24
- a) Interface:
- Klik Apply → OK
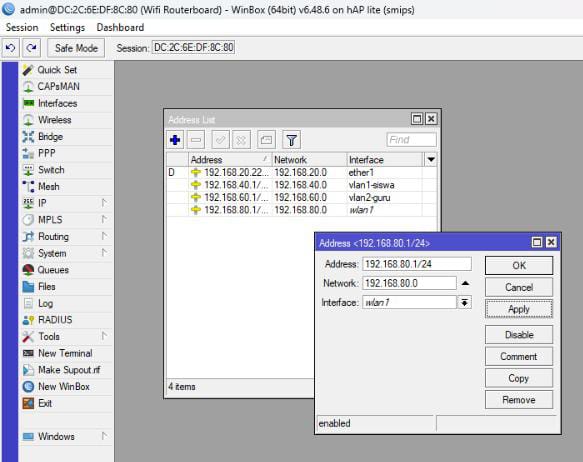
b. VLAN 1:
- Klik
IP→Addresses→ Klik "+" - Atur:
- a) Interface:
vlan1-siswa - b) Address:
192.168.40.1/24
- a) Interface:
- Klik Apply → OK
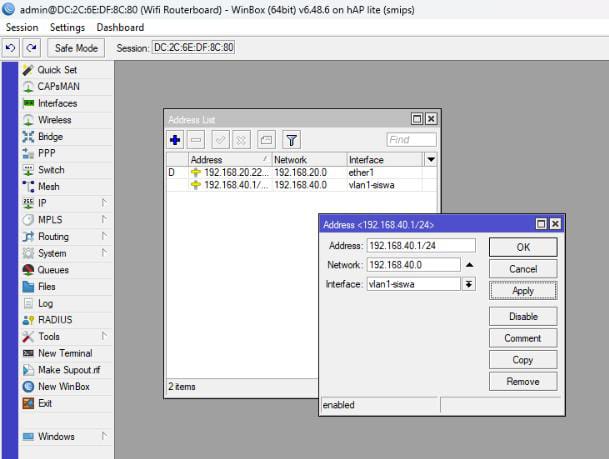
c. VLAN 2:
- Klik
IP→Addresses→ Klik "+" - Atur:
- a) Interface:
vlan2-guru - b) Address:
192.168.60.1/24
- a) Interface:
- Klik Apply → OK
7. Memberi DHCP Server WLAN & VLAN
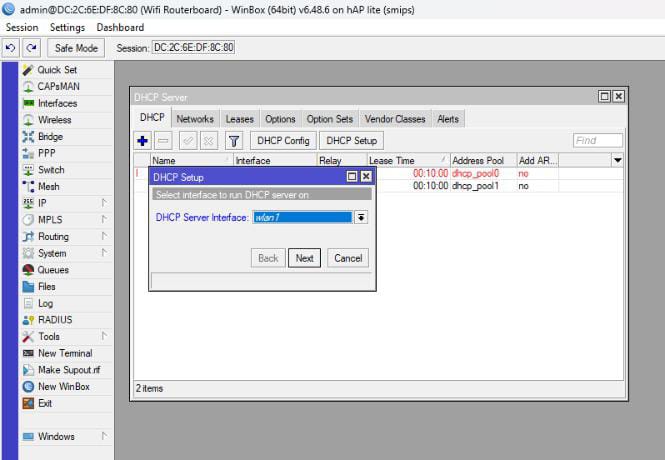
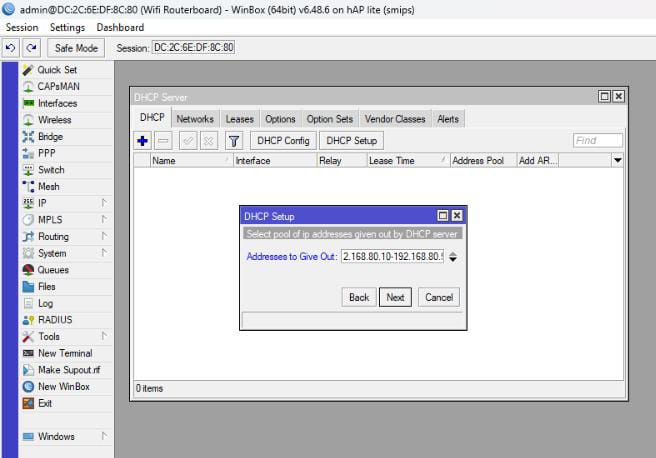
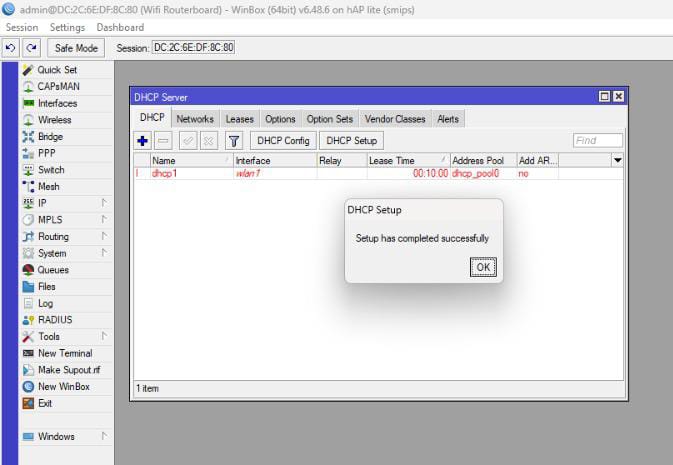
a. WLAN:
- Klik
IP→DHCP Server→DHCP Setup - Atur:
- a) Interface:
wlan1 - b) Address to Give Out:
192.168.20.10-192.168.20.50
- a) Interface:
- Next Sampai Selesai
b. VLAN1:
- Klik
IP→DHCP Server→DHCP Setup - Atur:
- a) Interface:
vlan1-siswa - b) Address to Give Out:
192.168.40.10-192.168.40.50
- a) Interface:
- Next Sampai Selesai
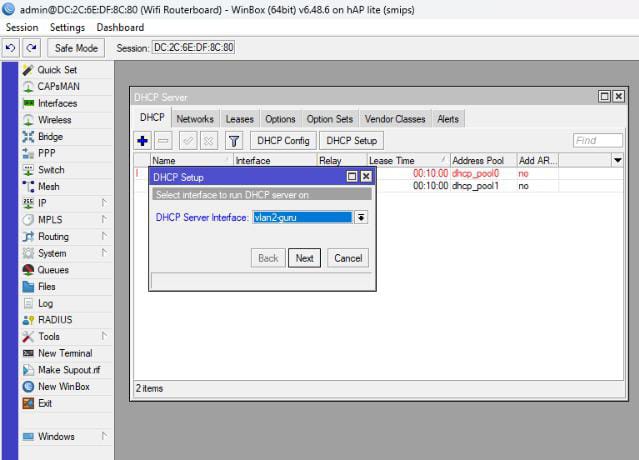
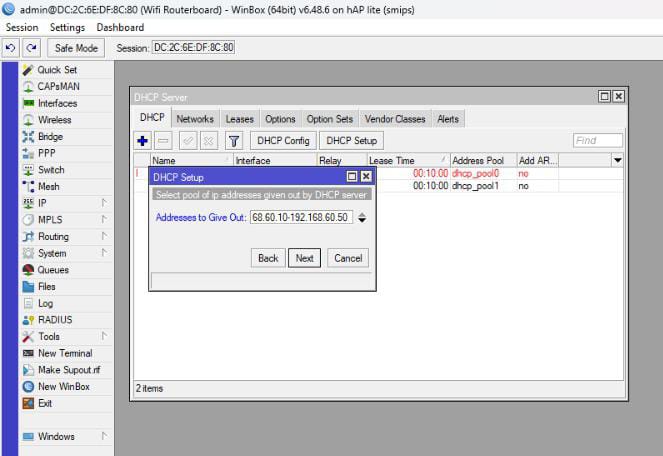
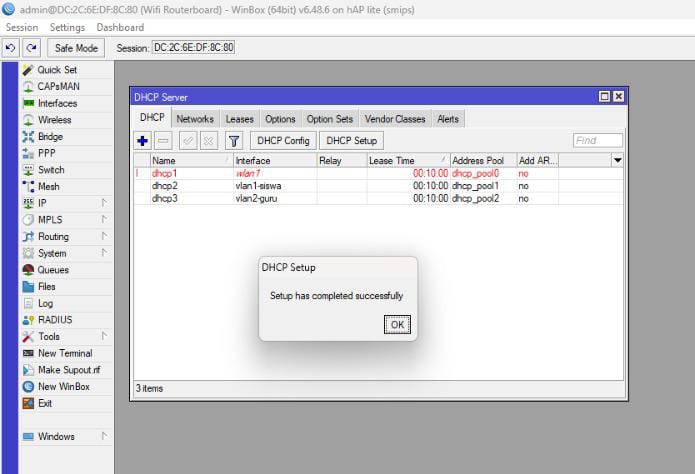
c. VLAN2:
- Klik
IP→DHCP Server→DHCP Setup - Atur:
- a) Interface:
vlan2-guru - b) Address to Give Out:
192.168.60.10-192.168.60.50
- a) Interface:
- Next Sampai Selesai
8. Konfigurasi WLAN
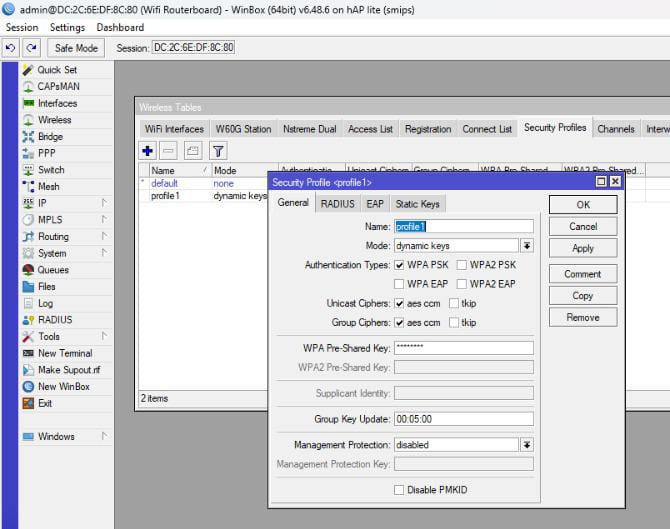
a. Membuat Security Profile (Password)
- Klik Wireless → Security Profiles → Klik "+"
- Atur:
- a) Name:
profile1(contoh) - b) Mode:
dynamic keys - c) Authentication types:
WPA PSK - d) WPA PSK Pre Shared Keys:
12345678(Password)
- a) Name:
- Klik Apply → OK
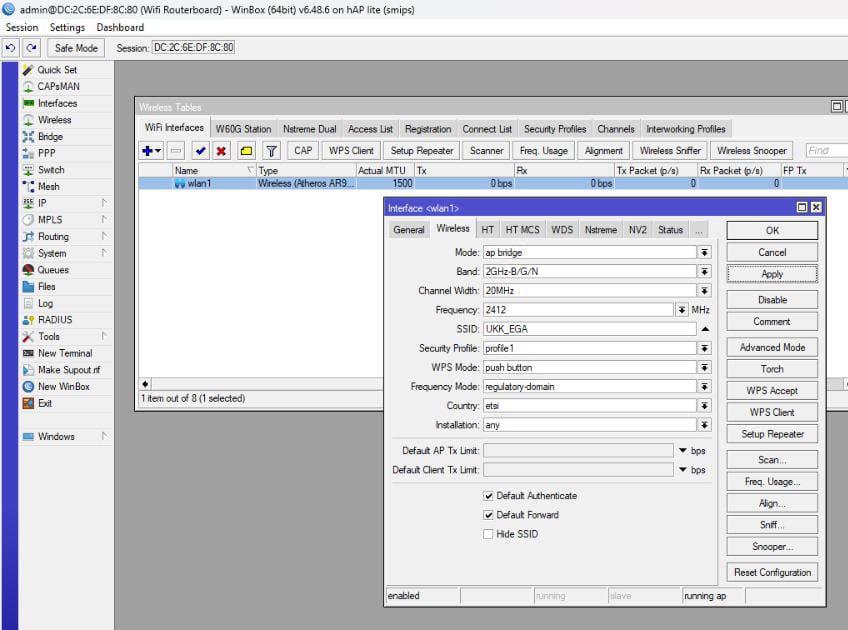
b. Atur wlan1
- Klik Wireless → Wifi Interfaces → Klik 2x "wlan1"
- Atur:
- a) Mode:
ap bridge - b) Band:
2Ghz B/G/N - c) SSID:
UKK_7(UKK_NoAbsen) - d) Profile:
profile1(yang tadi kita buat)
- a) Mode:
- Klik Apply → OK
9. Konfigurasi Hotspot
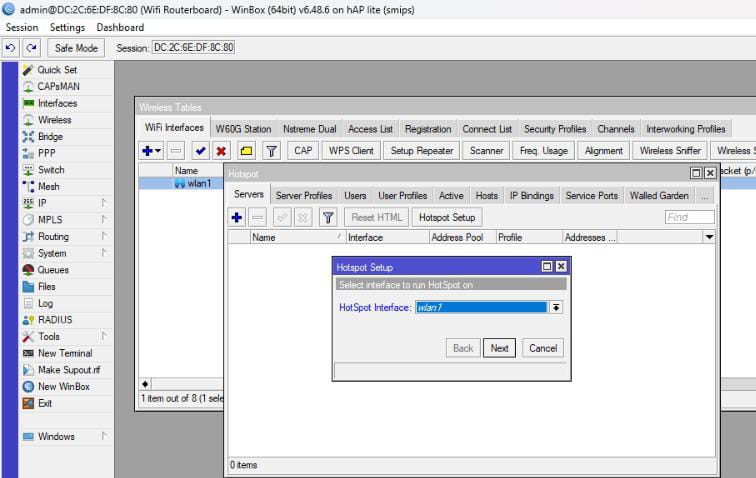
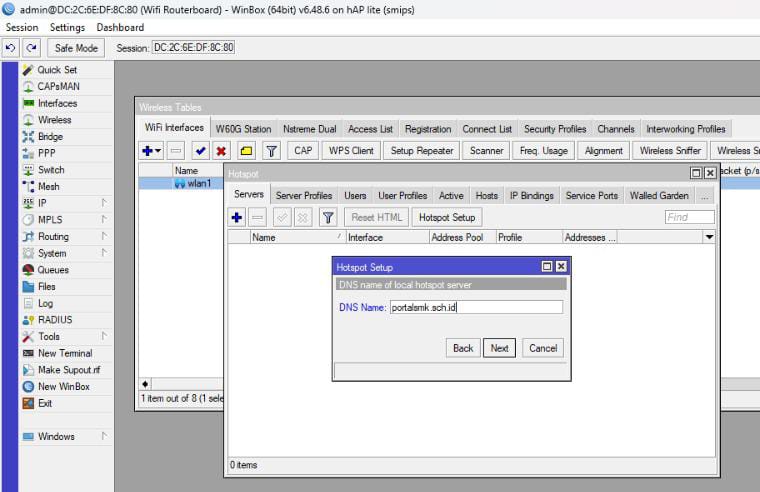
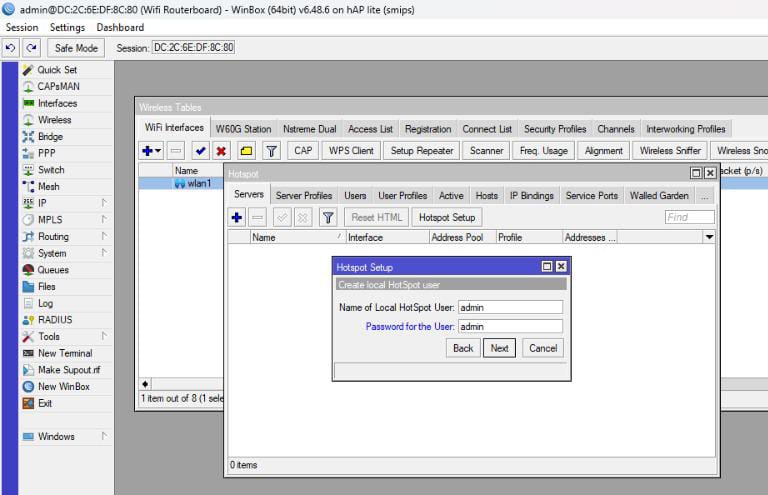
a. Membuat Server Hotspot
- Klik
IP→Hotspot→Servers→Hotspot Setup - Atur:
- a) Interface:
wlan1 - b) DNS Name:
portalsmk.sch.id - c) username:
admin - d) password:
admin
- a) Interface:
- Next sampai selesai
b. Membuat User Profiles kepalasekolah, guru & siswa
-
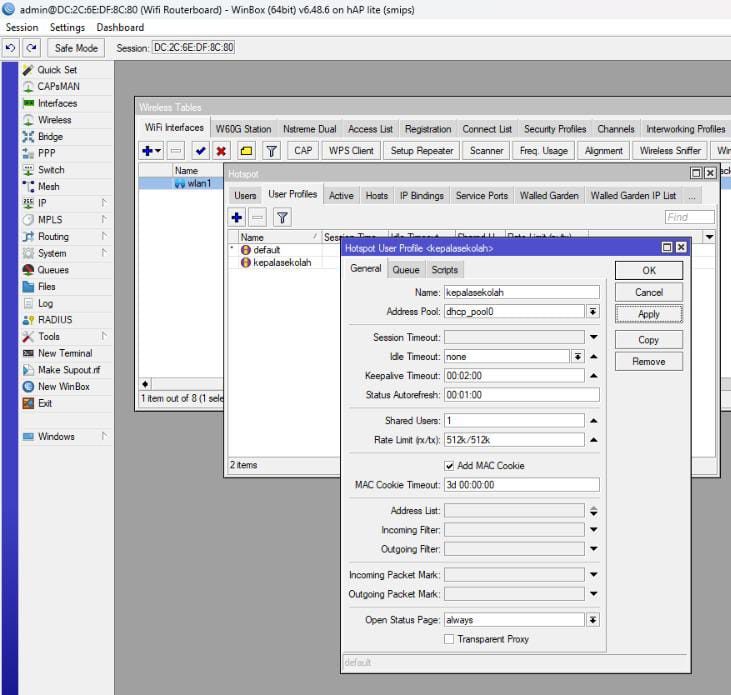
1) kepalasekolah
- Klik
IP→Hotspot→User Profiles→ Klik "+" - Atur:
- (1) Name:
kepalasekolah - (2) Address Pool:
dhcp_pool0(atau sesuaikan dhcp pool wlan kalian, liat di IP → Pool) - (3) Rate Limit (rx/tx):
512k/512k
- (1) Name:
- Klik Apply → OK
- Klik
-
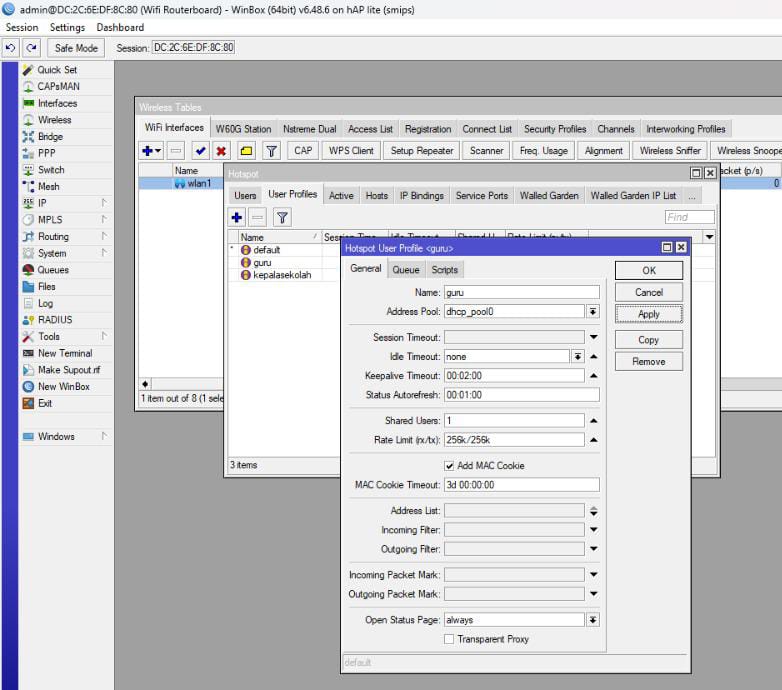
2) guru
- Klik
IP→Hotspot→User Profiles→ Klik "+" - Atur:
- (1) Name:
guru - (2) Address Pool:
dhcp_pool0(atau sesuaikan dhcp pool wlan kalian, liat di IP → Pool) - (3) Rate Limit (rx/tx):
256k/256k
- (1) Name:
- Klik Apply → OK
- Klik
-
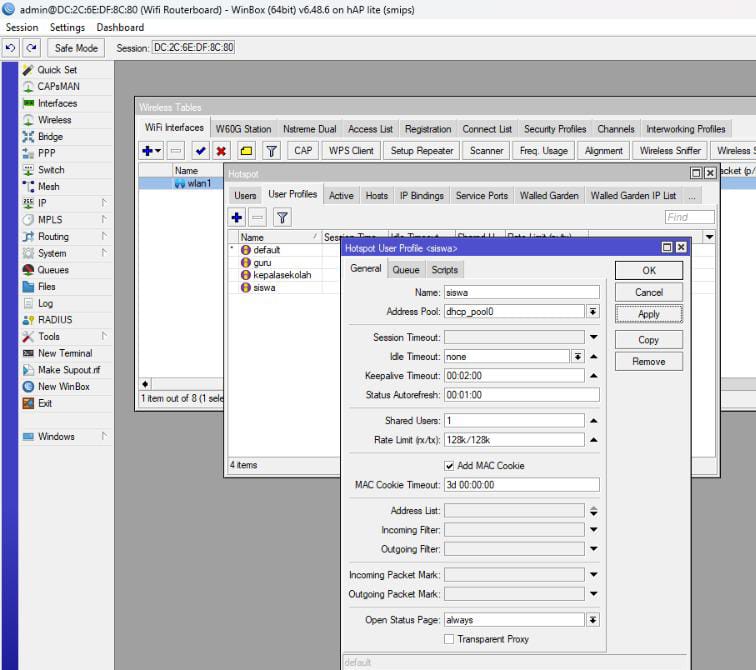
3) siswa
- Klik
IP→Hotspot→User Profiles→ Klik "+" - Atur:
- (1) Name:
siswa - (2) Address Pool:
dhcp_pool0(atau sesuaikan dhcp pool wlan kalian, liat di IP → Pool) - (3) Rate Limit (rx/tx):
128k/128k
- (1) Name:
- Klik Apply → OK
- Klik
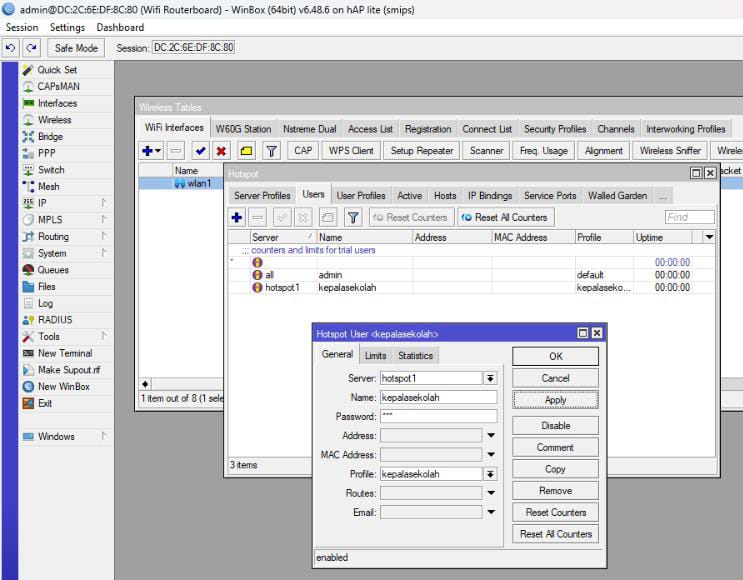
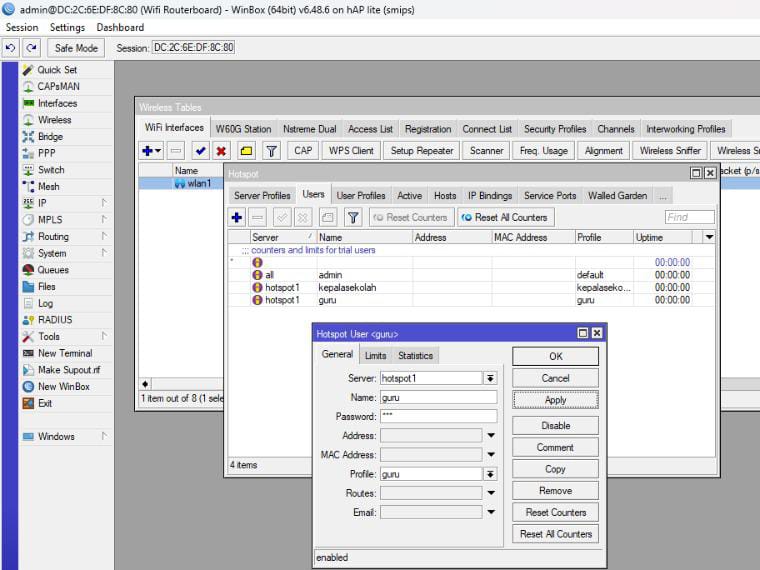
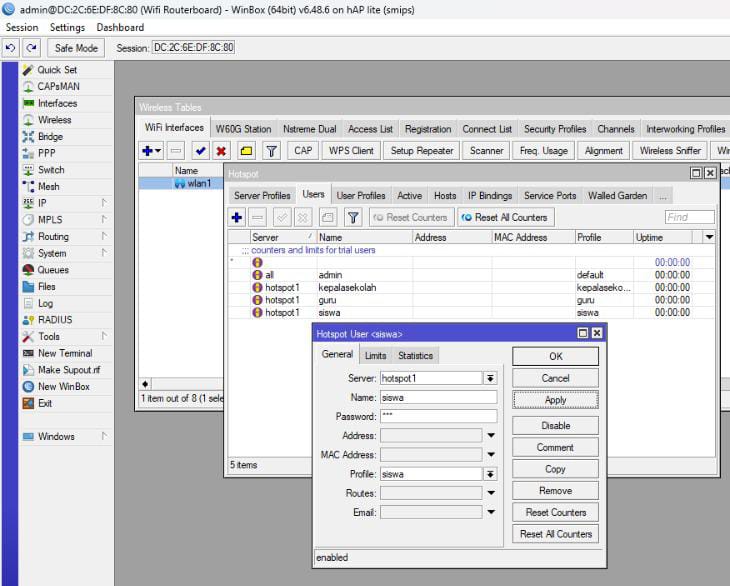
c. Membuat Users (Voucher)
-
1) kepalasekolah
- Klik
IP→Hotspot→Users→ Klik "+" - Atur:
- (1) Server:
hotspot1 - (2) Name:
kepalasekolah - (3) Password:
123 - (4) Profile:
kepalasekolah
- (1) Server:
- Klik
-
2) guru
- Klik
IP→Hotspot→Users→ Klik "+" - Atur:
- (1) Server:
hotspot1 - (2) Name:
guru - (3) Password:
123 - (4) Profile:
guru
- (1) Server:
- Klik
-
3) siswa
- Klik
IP→Hotspot→Users→ Klik "+" - Atur:
- (1) Server:
hotspot1 - (2) Name:
siswa - (3) Password:
123 - (4) Profile:
siswa
- (1) Server:
- Klik
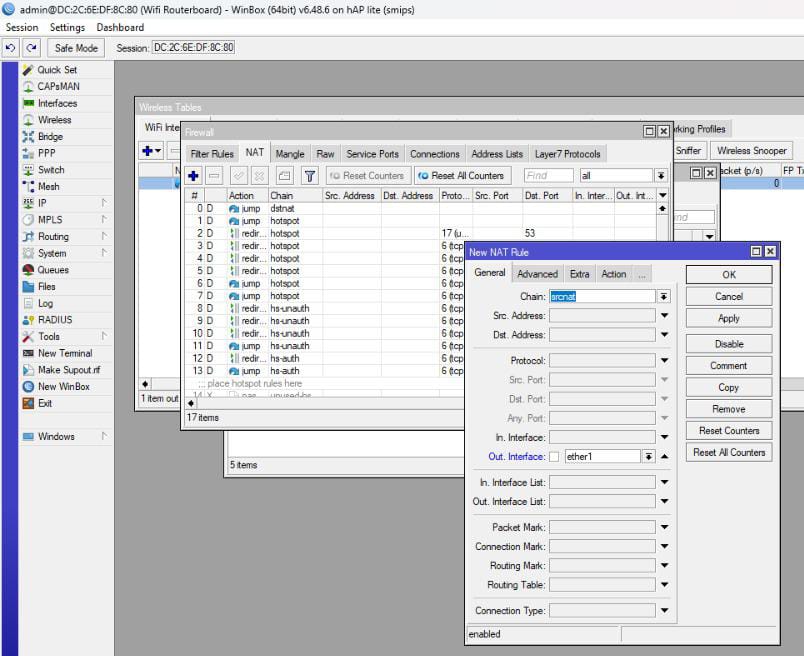
10. Konfigurasi NAT
- Klik
IP→Firewall→NAT→ Klik "+" - Masuk ke tab General
- 1) Out. Interface:
ether1
- 1) Out. Interface:
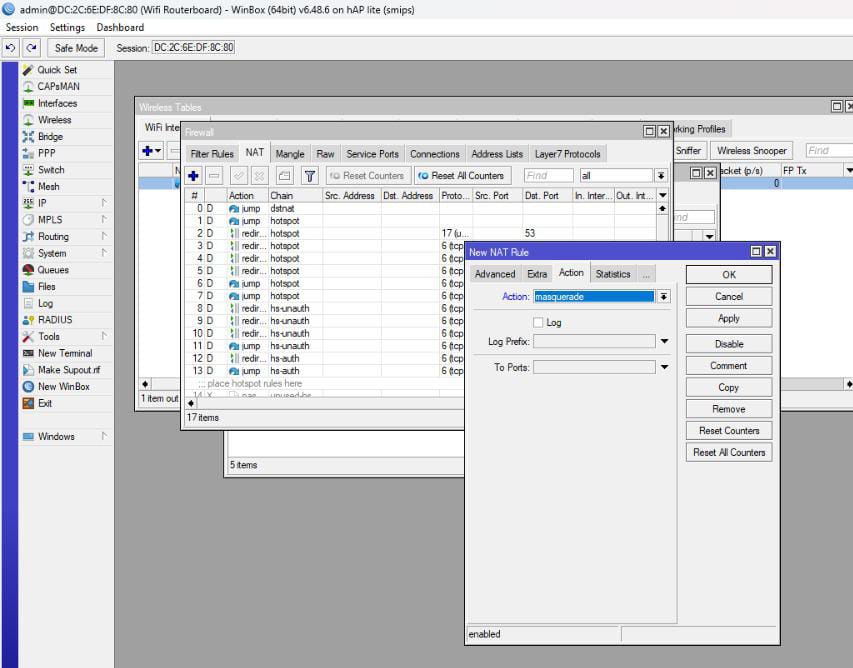
- Masuk ke tab action
- 1) action:
masquerade
- 1) action:
- Klik Apply → OK